
Twister Workshop – 16th November 2022 – 2-5pm
To make the most of time, please arrive and set up your work space ready to start sewing at 2pm


Some info for those of you who would like to take part in this mini workshop.
This patchwork is very simple to make using a specific ruler or template. ( I now know it’s much easier to make than to try and explain – see below!)
The workshop isn’t prescriptive – you can choose what to make. Obviously the size of your project will determine how much you get done in our 3 hour slot but everyone will know what to do to complete their piece and have some written instructions.
I would suggest some preparation before you come so that you’re ready to start ‘twisting’ but it’s not essential.
You will be working with either 5” squares OR 10” squares.
Having decided whether you’re using 5 or 10 inch squares and if it’s to be , for example, a table runner, cushion cover, special care baby unit quilt or quilt of any size, then cut out the required number of squares.
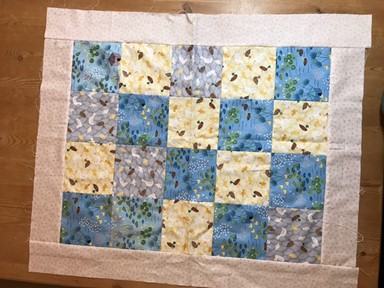
A SCBU quilt uses 20, 5” squares. The squares should be arranged as 5 rows of 4 squares. The arrangement of the twisters will be the same as the layout of squares. Sew the squares together to form a 4×5 rectangle and then add a 3” border to all sides. ( cut the border 3” – not finished size)
Any project using 5” squares requires a 3” border around it.
Any project using 10” squares requires a 6” border around it ( again – cut 6”)
To help you determine the size to make up this initial stage so that you get the desired finished size for your project it’s useful to know that –
The 5” squares, when cut to a twister, become 3 and a half “
The 10” squares, when cut to a twister, become 8”
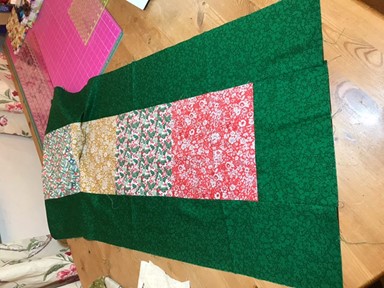
A table runner can be made using 1 row of 10” squares ( the number to suit the length of runner you’d like) with a 6” border all round.
Or 5” squares – 1 would suggest at least 3 rows to get a reasonable depth – with a 3” border. Using a charm pack to do 3×13 squares works.
Equally a 10” layer cake arranged 6×7 makes a lovely quilt – plenty of scope to add borders to increase size…
What ever you’re making, if you have your project prepped to a rectangle of your chosen size with a border in advance, then you’ll be ready to start twisting at the workshop.
But, if you’d prefer to sew your squares together at the workshop and do the twisting stage at home having seen how, that’s ok too.
The list of requirements for the workshop is:
- Sewing machine
- Extension lead
- Cutting mat
- Rotary cutter
- Ruler – not bigger than 12” is easier to work with or 8” square or 3 and half” square
- Pins, scissors, thread etc
- Pen for marking fabric
- Pen and paper
